This site uses advanced css techniques
Though the great majority of users need access to only one instance of an Evo server from their desktops, there are some circumstances where having two Evolution icons makes sense, each going to a different server.
If both payroll servers are running the same application version, then it's a simple matter of launching the same Evolution icon twice, then entering different server/credential information. But this has its limits because application versions are often different.
If the application versions are different, the Evo client will attempt to auto-update itself to the version it's connected to, and this will fail if there's a second instance of Evo out there (Windows does not allow updating a file that's in use).
So in this Evo Tip we show how to make a second (or third!) instance of Evo that can operate independently of the main one.
Note: if you don't have a C:\iSystems directory, then you are operating from an older installer for Evo that puts their files in C:\Program Files\Evolution. Though this can probably be made to work, I recommend uninstalling Evo and reinstalling with a newer installer.
 In this folder you'll see a single "Client" folder, we need
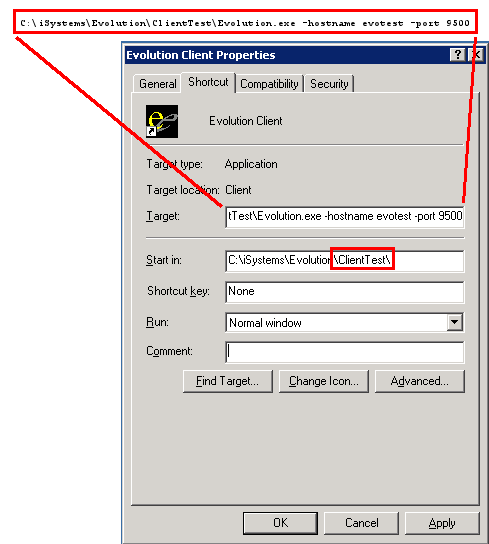
to make a copy to a folder called "ClientTest":
In this folder you'll see a single "Client" folder, we need
to make a copy to a folder called "ClientTest":
(space) -hostname evotest -port 9500
(space) -hostname evolive -port 9500
Here we show the server hostnames as evolive and evotest; these should be replaced with the hostname or IP address of the server hosting that environment.
Now there should be two icons on the desktop, each pinned to its own server, and each with its own copy of the Evo program files, allowing each to be updated independently by the server it connects with.
Adjust this as needed if one of the icons requires Remote Relay, which would set the port to 9901 instead of 9500.
When editing the shortcut's Target, Evo supports a few command-line parameters. Parameters not provided on the command line are filled in from the registry: when the two side-by-side users are the same (say, "steve" logs into test and live), then only hostname is needed.
But when the two (or three) Evo servers are not all to the same entity - say, internal LIVE system plus using Paydata for the SB's own payroll - then other options have to be changed too.
First published: 2013/08/19
![[Steve's Email]](/images/steve-email.gif)