This site uses advanced css techniques
This Evo Tip is obsolete; the Lincoln release replaced the EEC (Evolution Enterprise Controller) with the EM (Evolution Management Console), which does not use SSL.
The Evolution™ payroll service-bureau software from iSystems includes a web-based component, the Evolution Enterprise Controller, and it's the main vehicle by which a Windows Evolution middle-tier system is managed.
![[Security Warning]](../images/deploy-webcert-gp-0.gif) The service is offered over a https connection secured with SSL,
but the SSL certificate is self-signed (not traced back to a root CA),
and the cert's common name does not match the name of the webserver. This
means that when a web browser visits the site, it's always greeted with
some certificate warnings.
The service is offered over a https connection secured with SSL,
but the SSL certificate is self-signed (not traced back to a root CA),
and the cert's common name does not match the name of the webserver. This
means that when a web browser visits the site, it's always greeted with
some certificate warnings.
Though it's not difficult to dispense with this message — one can accept the certificate with a few clicks — all users on all workstations must go through this every time. It's possible to dispatch with the untrusted-issuer warning by installing it into the local browser's cert list, but this doesn't bypass the name mismatch warning.
It's all just very annoying.
This Evo Tip describes how to dispense with both of the warnings by creating our own properly-named certificate, installing it into the EEC, and deploying the certificate as "trusted" with Group Policy. Once done, subsequent visits to the Enterprise Controller are unhindered by browser warnings.
Sites without a central Windows server may not be able to deploy the trusted certificate via Group Policy, but creating a suitable-named certificate to avoid the name mismatch error can be used by any Evolution installation.
Disclaimer - We'll also note that we are not even remotely approaching PKI or Group Policy experts, and we have mainly muddled through several of the choices offered on the road to something that appears to work well. We'd certainly welcome input from those who actually know this stuff.
The SSL instructions have been tested with both Hartland and Irasburg releases, the Group Policy instructions apply to Windows Server 2003.
The webserver certificate shipped with the EEC is completely generic in nature, and in order to bypass the name-mismatch warning, we must create a certficate with the exact name used to visit the EEC.
There are plenty of tools for creating certificates, including some which ship with Windows itself (mainly for use by IIS), but we've chosen to to use the OpenSSL tools which are included in essentially ever version of Linux. Since the database servers almost certainly have these tools, it's a common mechanism available for all Evolution service bureaus.
The only tool required is the program openssl, which is almost always installed available as /usr/bin/openssl. All this can be done as a non-root user.
First we create the webserver key itself: this is a strictly mathematical operation which doesn't encode any names or trusted roots or the like. iSystems normally uses the curious key size of 4196 bits, but 1024 is entirely adequate for these purposes:
$ openssl genrsa -out key.pem 1024
Generating RSA private key, 1024 bit long modulus
............................++++++
.....++++++
e is 65537 (0x10001)
Now, the file key.pem contains the webserver private key unprotected by any kind of passphrase, and it's eventually going to be installed on the EEC machine as the server key. The file is in ASCII, though is not human readable in any meaningful sense:
-----BEGIN RSA PRIVATE KEY-----
UtOzMngpi7hiDxQyjI7RkwjCUTRtqi1NchryqFIICeCoP9ugpSORs5oBHipasa0b
... many lines like this
MIICXQIBAAKBgQCpPjv6kRyzPOrgoeXoeoaS/Vv+U97Z
-----END RSA PRIVATE KEY-----
An SSL Certificate contains a long list of items, but the most important for our purposes is the Common Name, which is the DNS name used to access the EEC via https. This name is plugged into the web browser of the client, and that's the name which must exactly match (on a case-insensitive basis) the name in the certificate.
We suspect that many sites access their EEC via IP address rather than by DNS name, something we consider rather sloppy, but neverthless is permitted. Those sites that insist on using IP addresses can use the IP for the Comon Name, but others must be a bit more thoughtful.
We prefer to use the names eeclive.stevepay.lan and eectest.stevepay.lan because this allows for parallel production and test systems, and it separates the function (EEC) from the underlying machine names. Since machines do come and go, using a single DNS name for the function allows for stable access URLs even when things are moved around.
This step uses the server key generated in the previous step and adds in the server name and other identifying information. This is what's considered by a web browser when deciding how much trust to give to a site one visits.
We're taking a shortcut here by combining two steps — creation of a Certificate Signing Request (CSR) as well as self-signing that request — into one: since we're not getting our CSR signed by a real Certificate Authority, there's no harm in just doing it all at once.
$ openssl req -new -x509 -days 3650 -key key.pem > eectest.pem
You are about to be asked to enter information that will be incorporated
into your certificate request.
What you are about to enter is what is called a Distinguished Name or a DN.
There are quite a few fields but you can leave some blank
For some fields there will be a default value,
If you enter '.', the field will be left blank.
-----
Country Name (2 letter code) [GB]:US
State or Province Name (full name) [Berkshire]:CA
Locality Name (eg, city) [Newbury]:Tustin
Organization Name (eg, company) [My Company Ltd]:StevePay, Inc.
Organizational Unit Name (eg, section) []:
Common Name (eg, your name or your server's hostname) []:eectest.stevepay.lan
Email Address []:steve@unixwiz.net
Understanding the details is not strictly required in order to create and install a certificate, but the curious may be interested in how the various options participate in creation of our cert.
Note that service bureaus with both test and production systems can use the same server key, but must generate a separate certificate for each EEC, because the Common Name will be different in each.
The EEC is found on one of the Windows middle-tier machines, usually (but not always) on the same system that hosts the Registration Daemon. In the installation directory C:\Program Files\Evolution\EnterpriseController are three SSL-related files:
We're going to replace the first two of them with the files we generated in the previous steps, leaving the root.pem alone. The original certificate file was signed by the root authority represented by root.pem, but our self-signing of the new cert means we don't need this anymore.
Make a backup of the original Evo-provided files, copy the new ones in place, and restart the Evolution Enterprise Controller from the Services applet in the Control Panel. This restarts the application webserver with the new keys.
 To test this, simply visit the EEC with a URL composed of the
Common Name as mentioned above:
To test this, simply visit the EEC with a URL composed of the
Common Name as mentioned above:
https://eectest.stevepay.lan
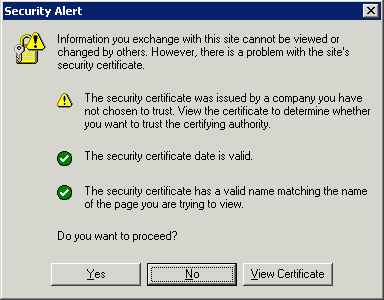
At this point, we're almost certainly going to get a browser Security Alert, but it's important to pay attention closely to which of the three possible alerts is being given: we should only get one.
Because this is a self-signed certificate, the browser cannot verify the chain of trust flowing down from the root Certificate Authorities to this certificate. This means we will surely get a warning about the untrusted cert. We're going to fix this in the next section.
The second item would warn about an expired certificate, which we don't expect here.
It's the third warning about a mismatched name that we should have dispensed with by installing our own cert, so this ought to have the green check.
The key and certificate files above are suitable for installation into the webserver component of the EEC, but neither is in a form which can be deployed with Group Policy. There seems to be a plethora of cryptographic file formats, and we must convert from one to another.
This is also done with the openssl command, and the proccess incorporates both of the files used before to creating a cert.p12 file. This is in PKCS#12 format, and it was the only format we could find which which OpenSSL could create and Windows could read.
$ openssl pkcs12 -export -inkey key.pem \
       -in cert.pem -out eectest.p12 \
       -passout pass: \
       -name "EEC Test SSL Key"
The -name should be chosen to reflect the proper purpose of the key, and for parallel production/test installations, the name should reflect the appropriate purpose:
The output filename should likewise be chosen.
The PKCS#12 format can protect the contents with a secret passphrase, but we use the -passout pass: provides an empty one.
The output file is in binary and cannot be examined readily, but it's now ready to be transferred to the Windows domain controller.
With the file eectest.p12 now on the server, we're ready to deploy the certificate. These instructions apply to Windows Small Business Server 2003, but the same general idea ought to be transferrable to other versions.
![[]](../images/evo-eec-webcert-4.gif) Launch the Group Policy Manager
and navigate to a suitable object: we prefer the Default
Domain Policy because there is no harm in deploying this
certificate throughout the entire enterprise. Right-click
on that object and select Edit:
Launch the Group Policy Manager
and navigate to a suitable object: we prefer the Default
Domain Policy because there is no harm in deploying this
certificate throughout the entire enterprise. Right-click
on that object and select Edit:
![[]](../images/evo-eec-webcert-5.gif) In the Group Policy Object Editor, navigate down to:
Computer Configuration
In the Group Policy Object Editor, navigate down to:
Computer Configuration
» Windows Settings
» Security Settings
» Public Key Policies
» Trusted Root Certification Authorities
Then right-click and select Import.
![[Select File to Import]](../images/evo-eec-webcert-6a.gif) In the Certificate Import Wizard, browse to the location of the
file; here we're looking for eectest.p12. Click
[Next].
In the Certificate Import Wizard, browse to the location of the
file; here we're looking for eectest.p12. Click
[Next].
![[]](../images/deploy-webcert-gp-6.gif) With the file selected, we're shown the Certificate Store
dialog that selects the target location for the cert.
We've seen only one choice available with all the rest
grayed out. Click Next.
With the file selected, we're shown the Certificate Store
dialog that selects the target location for the cert.
We've seen only one choice available with all the rest
grayed out. Click Next.
![[Password prompt]](../images/evo-eec-webcert-6b.gif) The PKCS#12 format allows for provision of a protective passphrase,
but the -passout pass: has set an empty one. Clicking
Next with the password field "decrypts" the provided certificate.
The PKCS#12 format allows for provision of a protective passphrase,
but the -passout pass: has set an empty one. Clicking
Next with the password field "decrypts" the provided certificate.
![[]](../images/evo-eec-webcert-7.gif) In the wizard completion dialog, review the settings: they should
all be familiar. Click Finish.
In the wizard completion dialog, review the settings: they should
all be familiar. Click Finish.
![[Finished! Certificate imported]](../images/evo-eec-webcert-8.gif) Finished! Close the Group Policy editor.
Finished! Close the Group Policy editor.
Once the certificates have been imported into Group Policy, they are deployed throughout the enterprise. Propagation of GP updates can take some time depending on the refresh interval, but it's usually a round 90 minutes, or the next reboot. This is not likely to be such a time-critical change that it need be manually forced to all the desktops.
Remember that the Common Name must match exactly, so in our example, one must use https://eeclive.stevepay.lan, not https://eeclive, but with suitable bookmarking, this should completely bypass the browser security warnings.
Multiple (and unrelated) certificates may be deployed in the same way, so that as other systems enter production with self-signed certs, they may be included in the same Group Policy object.
We should note, however, that this procedure is intended for self-signed certificates that are known to be trusted, and it's not meant to ameliorate browsing sites with broken certs (expired, wrong server name, etc.). Please keep in mind that SSL certificates are a security measure, and bypassing it thoughtlessly may lead to unpleasant surprises.
First published: 2006/06/24
![[Steve's Email]](/images/steve-email.gif)