This site uses advanced css techniques
A customer's RAID controller failed in a way that corrupted the on-disk array configuration, rendering the NTFS volumes unreadable even after replacing the failed controller hardware. These volumes contained data of some importance, and we were asked to look into it before shipping the drives off to the expensive (but very good) data-recovery services such as Ontrack Data Recovery.
With the use of a bootable Knoppix Linux live CD, a scratch SCSI drive, an external USB hard drive, and an onsite technician, we were able to remotely recover all the data from the failed array.
This seemed like a useful enough feat that we're documenting our particular procedure in case others might be called down the same scary road.
But we'll note that this is just one of many possible approaches, and we prefer to think of this as a log of this particular journey rather than a general travel guide.
Adapt these findings to your own situation... with care.
This is a dangerous procedure, requiring substantial technical skills, the ability to think well on your feet, a good sense for risk, and nerves of steel. Getting it wrong can leave your drives in worse shape than when you found it, including complete and irrevocable loss of all data.
At minimum, you must have substantial Linux expertise to even attempt this, even if the underlying data is for a Windows filesystem. This is not a task to learn on the job or to just poke at it.
We accept no responsiblity for damage to data resulting from misuse of these notes. When in doubt, find a professional.
The failed system was a Dell server with a PERC 2 RAID controller running Windows Server 2003. The five drives in array were configured as:
The key to our easy success was the RAID 1 array configuration: this is drive mirroring, where each of the pair contains a full copy of the data. Our suspicion — which proved to be correct — is that the RAID configuration was stored at the start of each drive, appearing before the partition table.
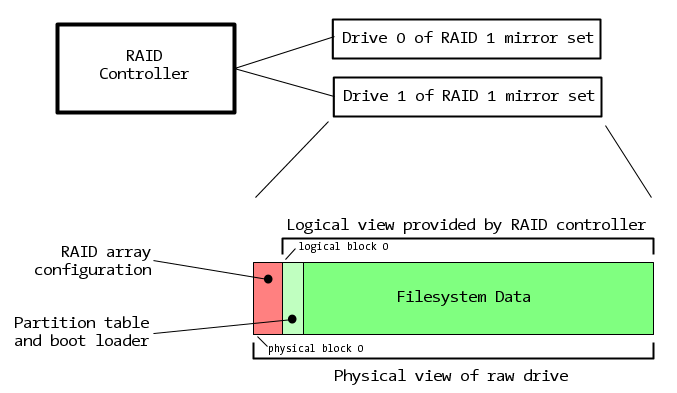
In this case, RAID 1 uses two physical drives, but presents one logical view of the protected data to the operating system.
When the drive has the proper housekeeping information at the start, the RAID controller will present to the host computer a view of the mirror set that excludes the housekeeping information with the partition table stored at virtual block 0). But if the drive is read by a regular SCSI controller, the partition table is found later - no part of the OS will ever see it.
Our goal is to regain the logical view of the drive with block zero pointing to the partition table, ignoring the RAID overhead.
The first step in any recovery effort is to label the existing drives so you don't lose track of which came from where, usually noted by drive bay number or SCSI ID. Note additional info if known ("C: drive, mirror 1", etc.).
One can even photocopy the drive labels and note this information on the hardcopy output.
You'll be sorry if you don't handle this early.
All recovery efforts require a workstation with the ability to read the drives in "native" mode - outside the RAID controller's meddlesome influences - and this can be done on either the failed machine itself, or on a separate recovery workstation.
We'll need the ability to read the mirror sets (usually one at a time), as well as another piece of media that can receive the recovered data. In our case we used a very large external USB hard drive.
To avoid touching the hard drives inadvertently, we chose to do all of our work using a Knoppix bootable "live CD": this runs a Linux workstation strictly from the CD-ROM, and though it's slow, it doesn't touch the existing hard drives.
We were 2,000 miles away from the recovery workstation in question, so we used the services of an onsite technician to be our eyes and hands; those who are performing this onsite won't need these extra steps, but it's instructive to see how this actually works in a pinch.
The onsite tech chose an XP system near the recovery workstation, both of which were connected to the local area network (and the XP system had internet access).
Using desktop session-sharing software (WebEx), he was able to grant remote control of his workstation - this put us on the same network as the recovery workstation.
The onsite tech booted the Knoppix Live CD: be patient, it's slow. It should acquire an IP address from the network's local DHCP server (if not, it must be set manually to enable remote access, but that setup is beyond the scope of this article).
Once up, he selected a console session providing a shell, and then performed these steps:
$ su -                          — become the superuser

# passwd root                   — account is locked by default
Password: hello
Again: hello

# ifconfig                      — find out this station's IP address
eth0      Link encap:Ethernet  HWaddr 00:E0:1E:FC:11:40
          inet addr:192.168.50.158  Bcast:192.168.50.255  Mask:255.255.255.0
          ...

# /etc/init.d/ssh start         — launch Secure Shell daemon
We then used PuTTY to get on the machine in question from the technician's workstation, connecting by IP address as the root user. Now we're on the recovery console remotely.
The rest of these steps will be mostly the same whether you're on the system remotely or directly.
Now that we're on the recovery workstation in our Knoppix root shell session, we must take stock of the attached drives before we begin any recovery.
We recommend putting just one of the failed drives in the recovery workstation at a time, as this reduces the chance of trashing the whole set with an errant command. This is certainly easiest with hot-swap drives. But one can load all at once if one is very careful.
Our first step is to determine the Linux device names for each drive: they are usually in the form of /dev/sdX, where X is a sequential letter that increments on each drive found by the system while booting. We typically find this by going through the output of the dmesg command, which reports the boot-time discovery process.
It's a lot of output, so we usually route the output to a file and then peruse it with the vi editor.
# dmesg > /tmp/dmesg.out

# vi /tmp/dmesg.out
With the file conveniently in the vi editor, we search for the SCSI configuration lines that will help us identify each drive.
...
scsi0 : Adaptec AIC7XXX EISA/VLB/PCI SCSI HBA DRIVER, Rev 7.0
        <Adaptec 29160 Ultra160 SCSI adapter>
        aic7892: Ultra160 Wide Channel A, SCSI Id=7, 32/253 SCBs

scsi 0:0:2:0: Direct-Access     HITACHI  DK32DJ-36MC      D4D4 PQ: 0 ANSI: 3
scsi0:A:2:0: Tagged Queuing enabled.  Depth 253
 target0:2:0: Beginning Domain Validation
 target0:2:0: wide asynchronous
 target0:2:0: FAST-80 WIDE SCSI 160.0 MB/s DT (12.5 ns, offset 100)
 target0:2:0: Ending Domain Validation
SCSI device sda: 71132959 512-byte hdwr sectors (36420 MB)
...
The first mention of SCSI is the Adaptec controller on Id=7, followed by a Hitachi drive that's presumably part of our failed mirror set. The long SCSI addresses are broken down this way:
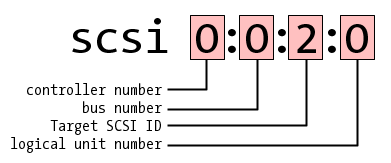
The Hitachi drive has SCSI ID 2, which we were able to correlate with its place in the original failed array. We also note that it's SCSI device sda, which means that /dev/sda addresses this drive.
| Device | SCSI address | Drive vendor | Description |
|---|---|---|---|
| /dev/sda | scsi 0:0:2:0 | HITACHI DK32DJ-36MC | From Bay 4 - failed C: mirror |
| /dev/sdb | scsi 0:0:3:0 | FUJITSU MAP3367NC | scratch drive |
| /dev/sdc | scsi 1:0:0:0 | WD 1600BEV | External USB |
| /dev/sdd | scsi 2:0:0:0 | HITACHI DK32DJ-36MC | From Bay 3 - failed C: mirror |
| /dev/sde | scsi 2:0:1:0 | HITACHI DK32DJ-36MC | From Bay 2 - failed D: mirror |
| /dev/sdf | scsi 2:0:2:0 | HITACHI DK32DJ-36MC | From Bay 1 - failed D: mirror |
| /dev/sdg | scsi 2:0:3:0 | HITACHI DK32DJ-36MC | From Bay 0 - failed E: |
One should go through the whole dmesg output until every drive is accounted for. We'll note that Linux uses the SCSI driver interface even for non-SCSI devices — presumably this is a clean, consistent driver API — so even the external USB drive shows up as SCSI.
IMPORTANT: this table must be manually recreated every time Knoppix boots because we've seen the controllers discovered in different orders on subsequent reboot: this changes the device names.
Writing to the wrong device could be very painful, or at least confusing.
The next step is to choose a device to work with. Since each half of a mirror set ostensibly contains a full copy of the data, we only need one drive to recover the whole volume. Here we're choosing /dev/sda, which represents half of the failed C: drive.
Recall that we speculate that the drive has some RAID housekeeping data at the start, followed by the partition table and the rest of the drive: now it's a matter of finding out where the boundary is.
It turns out that both the block 0 master boot record (containing the partition table), as well as the start-of-partition boot record, have a signature that makes them relatively easy to find by scanning: the last two bytes are hex digits 0x55 and 0xAA.
This causes plenty of false positives over a large volume, and though we could add heuristics to make it smarter, we're just really looking for the first block that looks like a partition table in the hopes that it gives us a clue.
Downloading the code from our website, we ran it on the device:
# /tmp/scandrive -v /dev/sda
scandrive 1.00 - 2002-02-01 - http://www.unixwiz.net/tools/
I/O buffer: 256 sectors of 512 bytes
Device /dev/sda is open
Loop 0: scanning sector 0...
Found ptable magic at sector 128                   — partition table
Found ptable magic at sector 191                   — start of filesystem
Loop 422: scanning sector 108032...
control-C                                          — interrupt scanning
So the first partition table is at sector 128, and since these are 512-byte sectors, this suggests that the RAID housekeeping is 64kbytes... which just happens to be the RAID stripe size. This is very promising.
If this is correct, it means that if we can somehow access the drive that makes sector 128 actually appear at sector 0, it's then a "regular" drive. In our first recovery, we did this the hard way and only discovered the much better way later.
Given our RAID drive that contains a "real" image starting 128 blocks into the drive, one approach is to copy this data to a scratch drive and do all our work there.
Our above listing of available drives shows /dev/sdb as a scratch drive. Though the dd command has been typically used for this, we prefer the workalike dcfldd instead, mainly because it shows running progress and gives a clue how long it will take.
After doublechecking our parameters — carefully! — we launch the full copy to the scratch drive. The parameters are:
We run it this way:
# dcfldd if=/dev/sda of=/dev/sdb bs=512 skip=128
This can take quite a long time depending on the size of the drive, the performance of the machine, and whether the drives share a common I/O bus. The use of the dcfldd command will report regular progress.
Once the command finishes, then /dev/sdb should be a "regular" drive in nearly every respect, so we check it with the fdisk. command. Here we show sample output from an unrelated system (we neglected to save a copy of the fdisk output on our recovery workstation).
# fdisk /dev/sdb                   — NOTE: this is from an unrelated system
...

Command (m for help): p            — show partition table

Disk /dev/sdb: 18.2 GB, 18207375360 bytes
255 heads, 32 sectors/track, 4358 cylinders
Units = cylinders of 8160 * 512 = 4177920 bytes

Device       Boot  Start     End    Blocks   Id  System
/dev/sdb1             10      34    102000   83  Linux
/dev/sdb2             35     291   1048560   82  Linux swap
/dev/sdb3      *       1       9     36704   12  Compaq diagnostics
/dev/sdb4            292    4358  16593360    f  Win95 Ext'd (LBA)
/dev/sdb5            292    4358  16593344   83  Linux

Command (m for help): q
The Linux kernel reads the partition table from a drive at boot time, but since these partitions were created indirectly by copying a drive, the kernel won't know anything about them yet. In addition, the device name entries for each partition (/dev/sda1 for the first partition, and so on) may not be created.
The partprobe command is used to get Linux to re-read the partition table of a drive that was modified outside the usual fdisk methods. Given the name of a device, it makes sure the kernel knows about the partitions:
# partprobe /dev/sdb
TODO: how are the device nodes created?
With the partition table in place and the device nodes available, it's time to mount the partition and see if we can get our data. We need a directory on which to mount the data, then attempt the mount itself:
# mkdir /mnt/ntfs

# mount -oro -tntfs /dev/sdb1 /mnt/ntfs

# cd /mnt/ntfs

# ls -l                        — poke around...
We believe that NTFS filesystem support in Linux is still a bit spotty, so we mount the partition readonly (the ro option): this avoids the chance of messing up the mounted filesystem with buggy NTFS support or our own mistake.
Once mounted, change to the directory and look around. Insure that there's data and that it's the partition you expected. Extraction of the data is covered in a later section.
Though copying the data to a scratch drive works, it's slow and not always necessary — we've found a far more direct way using the Linux loopback driver. This module allows us to map a view on top of an existing drive with an offset we specify.
The offset is 128×512=65536 bytes, and /dev/loop0 is the first available loopback device:
# losetup -o 65536 /dev/loop0 /dev/sda

# fdisk /dev/loop0
Now, /dev/loop0 is in fact accessing the failed RAID member, but it simply never sees anything before the given offset: it's exactly what we wanted. If all is well, fdisk should reveal the partitions.
TODO: does partprobe work here too? How about creating device nodes?
Though we believe that multiple partitions under the loop device work fine (which may well require partprobe and creating per-partition device nodes under /dev/), our particular approach didn't use it.
Instead, because we knew that the drive had just one partition, and that scandrive suggested it might be at block offset 191, we just looped and mounted it directly:
# /tmp/scandrive -v /dev/sda
...
Found ptable magic at sector 128                   — partition table
Found ptable magic at sector 191                   — start of filesystem
...

# losetup -o 97792 /dev/loop0 /dev/sda      — 97792=191×512 bytes

# mkdir /mnt/ntfs

# mount -oro -tntfs /dev/loop0 /mnt/ntfs

# cd /mnt/ntfs
We then proceed to extract the data.
Once /mnt/ntfs/ has our a mounted recovery partition, however obtained, it's time to get its data onto other media. We typically use an external USB hard drive, but it's also possible to do it over the network with either scp (secure shell copy, to a UNIX system), or with Samba to a Windows share.
Most external USB hard drives come preformatted with a single large filesystem, but FAT32 has a maximum filesize of 4G, which is unsuitable for many server applications (Exchange logs are often far larger.
It may be necessary to reformat the drive with NTFS, which has no such limits; this must be done from a Windows workstation.
We usually prefer to use the rsync program to copy data in bulk from the old to the new drive, as it allows us to restart a copy in progress. We usually put multiple recovered drives on the same external USB, so we normally create a subdirectory for each one.
Note: most administrators are used to using the --archive option with rsync, which implies a raft of other options, but the request to maintain owners, groups, and permissions doesn't always translate so well when NTFS and Linux filesystem concepts collide. Turning these options off makes the copy just about the data and not the metadata.
# mkdir /mnt/usb                 — mount the USB

# mount /dev/sdc1 /mnt/usb

# mkdir /mnt/usb/C-DRIVE

# rsync --recursive --times --verbose \
        --exclude="RECYCLER" \
        --exclude="System Volume Information" \
        --exclude="pagefile.sys" \
        /mnt/ntfs/.  /mnt/usb/C-DRIVE/.
Samba is the excellent CIFS/NETBIOS implementation for Linux, and the smbclient client is perfectly capable of migrating data across the network to a waiting share on a nearby server.
We'll encourage the reader to check with the many Samba resources on the internet to get the various authentication options right in the context of a recovery effort, using this as a guide:.
# cd /mnt/ntfs

# smbclient credentials '//myserver/myshare

  prompt
  recurse
  mput *
This will take some time to run, and there doesn't appear to be a way to exclude things we don't care about (say, pagefile.sys), but it ought to be mostly unattended.
We have used this method only with a very small filesystem, and without the recursive option.
As noted, the Linux permissions system doesn't really understand the NTFS structure found on the drive, and something is inevitably lost in the translation when extracting data using these Linux tools.
In many recovery scenarios, just getting back the data itself is plenty good, but in some others the metadata may be very important. In this case, intermediate by Linux is not likely to be successful.
Instead, one might perform a raw block copy (with dcfldd) from the source hard drive to the target USB's partition which transfers the NTFS filesystem without translation. Then, when the USB drive is moved elsewhere, the filesystem is seen exactly as found on the failed RAID mirror.
This may require a bit more work to match up partition sizes and the like, and though we've not tried it ourselves, believe it to be promising.
As we noted in the introduction, ours was one particular journey that managed to avoid several complicating factors which may well arise in other situations. During the process we noted some of these considerations and touch on them here, but they're meant more to be thinking points than providing specific direction.
First published: 2008/07/18
![[Steve's Email]](/images/steve-email.gif)